
I built my own HD camera with Rasbperry Pi just for fun. And, I also wrote a simple web service to live stream a video feed directly from my Raspberry Pi to any HLS video player out there using Google Cloud Run. Let me show you how I put together a simple system to capture, encode, and stream.
Some time during of the pandemic in 2020, I wanted to get a better webcam to improve the quality of my video conferencing in the remote-everything era. Being an engineer I did the logical thing to do: I built my own. Turns out that my spare personal time is quite scarce nowadays for a hobby project like this and the pandemic is almost over. Thankfully, I was finally able to put it in action and show you a working version.
The intial goal was to program it to be a USB camera that I could plug in to any computer and OS and use it with video conferencing software, mainly Google Meet. Along the way, I was inspired by the Nest Home service where you can see the live video feed from your security cameras and I thought, could I build something like that instead? At least, a proof-of-concept with the most basic functionality. So, I gave it a try.
I’ll give you an insight into the high-level design, implementation, deploying to Cloud Run, and caveats to keep in mind. But, before we dive into it, see it in action in this short clip. There’s some obvious motion towards the end of the clip.
Design
There are 4 pieces to this puzzle.
1. Capture
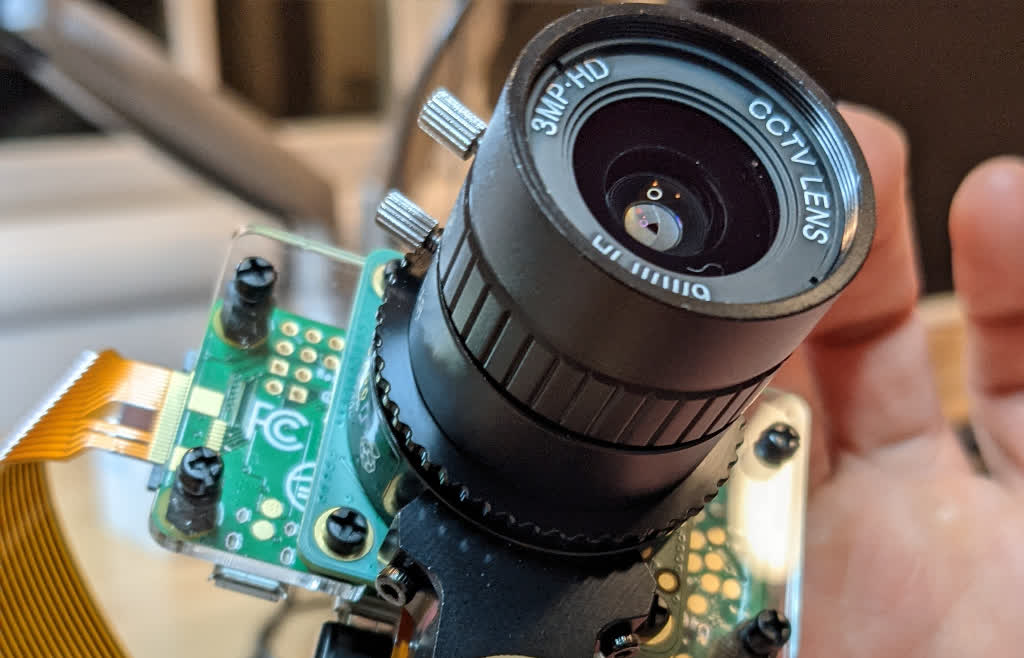
To assemble the camera I got a Raspberry Pi Zero W with NOOBS, a Raspberry Pi HD Camera, a mounting plate, and a tripod. The Pi Zero is more than capable for such a small computer. It has 512Mb of RAM, one USB port, and integrated WiFi. And, it’s remarkably small!
The camera module connects directly to the GPIO interface and has the ability to capture video directly in h264 and mpeg-4 formats. It captures a video track with no audio. While the video is already in a common video format, how do I stream it to any client player? How do I do it efficiently? And, most importantly, where do I stream from that is not directly from my Raspberry Pi Zero and private home network?
2. Encoding
One answer to how is to encode the h264 track in an HLS format. ffmpeg could do the job just fine. And, because the video track is already in a suitable format, the HLS encoder would be as fast. For practical purposes, it would be essentially copying the video stream, creating segments on-the-fly, and wrapping it in an HLS container. It is currently not creating an adaptive stream for simplicity and speed. However, making it so would be pretty straightforward.
3. Playback
Having a segmented HLS stream would make it available for playback to a very wide range of clients and platforms. I just need to serve both the manifest and segments from the server, and do it fast. For the web, I could use HTML5 <video/> directly or a libray like HLSjs. I chose the latter for added simplicity and several available features like handling reconnections and others parameters.
I serve both the encoding interface via websockets and the player via HTTPS from the same server. This makes it simpler to package and deploy to the cloud.
4. Serving from the Cloud
Putting this together in a service locally is pretty straighforward. I can run a Flask-based Python web service paired with SocketIO in my Pixelbook and access it from my Pi Zero Camera. But, how do I deploy it to the cloud so that I can serve the live stream from a proper infrastructure and not serve the world from my tiny Pi Zero without frying it?
This is where the beauty of Google Cloud Run really shines. Instead of my having to deal with VMs, scaling groups, CI/CD, and load balancing - amongst other things, I can simply package my code in a container and run a single command to deploy a new Cloud Run service. Cloud Run takes care of provisioning instances, autoscaling, load balancing, and everything else to run a service. It also supports HTTPS and websockets. And, it scales down to zero when not in use. What’s not to like!
One caveat is that Cloud Run does not currently support file sytems. However, it does support /dev/shm up to the available memory in your instance. That is, if you run an 8GB instance you’ll get plenty of “file system” space for temporary storage. For this use case, this is a brilliant feature. My encoder can write to “disk” and ffmpeg works like charm. An added benefit is that the files are in memory already. Serving the manifest and segments has minimal I/O overhead.
System Overview
This diagram illustrates the components put together and how the video flows from capture to encoding to playback.
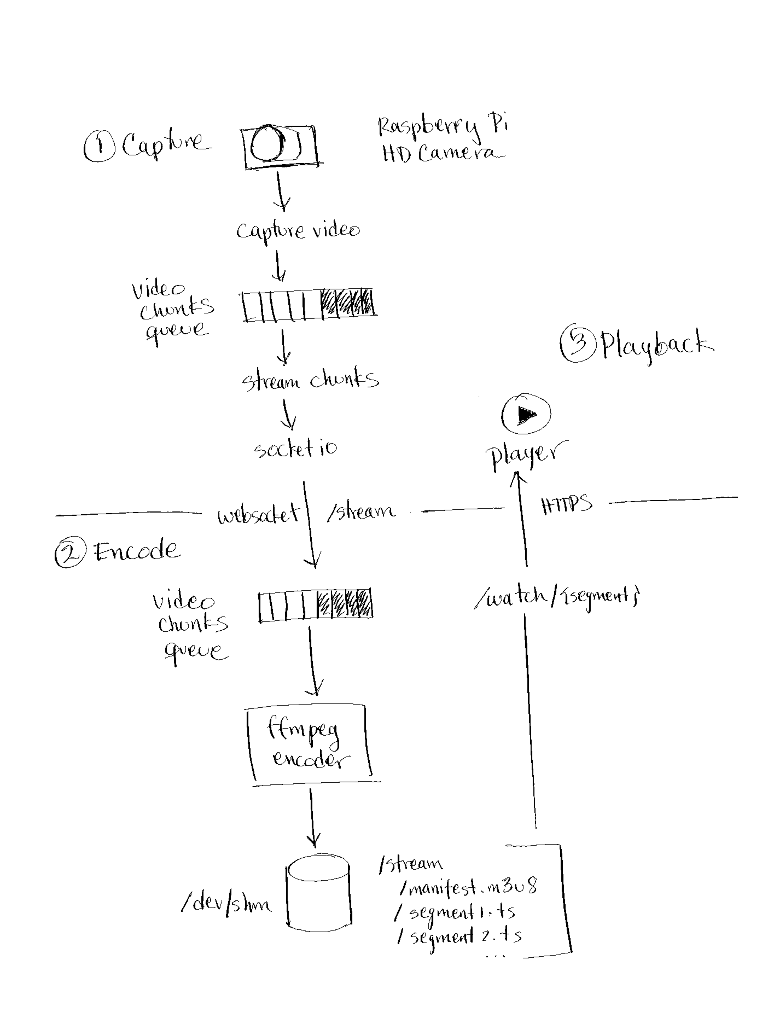
System design overview.
Implementation Insights
I will focus on the core aspects of the functionality to illustrate how things are pieced together.
1. Capture Client
The capture client is a command-line Python program that uses socketio for streaming captured video chunks up to the server via websockets. It also uses the official picamera Python module to capture an h264 video track. There is one thread for capturing video chunks from the camera and placing them in a thread-safe queue (this could be a circular buffer too.) There is another thread that gets video chunks from the queue and streams them to the server.
The core of the capture logic boils down to:
socket.connect(self.host, namespaces=['/stream'])
socket.start_background_task(source.stream)
socket.start_background_task(chunk_stream.stream)
socket.wait()
Where source.stream is the thread that captures video from the Pi Camera. While the camera can record in HD, I’m resizing to a smaller resolution during capture to reduce the network bandwidth needed to upload:
camera.start_recording(chunk_stream, format='h264', resize=(640, 360))
socketio handles reconnecting to the server automatically whenever the connection drops.
2. Encoder
The encoding server is written in Python using Flask and Flask-SocketIO. It serves both HTTPS and websocket requests for simplicity. The server starts an ffmpeg process when the remote capture client establishes a websocket connection to /stream. The process runs the encoding with the following parameters:
/usr/bin/ffmpeg \
    -i \
    -c:v copy \
    -g 25 \
    -sc_threshold 0 \
    -f hls \
    -hls_time 1 \
    -hls_list_size 5 \
    -hls_flags delete_segments \
    /dev/shm/stream/index.m3u8
This configuration produces a live streaming HLS manifest and retains the 5 most recent segments on “disk”. Removing -hls_list_size 5 -hls_flags delete_segments would retain all segments providing the clients the ability to play from an earlier point in the video. As mentioned before, this would be constrained by the available memory in the Cloud Run instance.
3. Playback
The web player uses HLSjs and streams the HLS segmented video via the HTTPS /watch/ endpoint:
var video = document.getElementById('video');
var hls = new Hls({
    liveDurationInfinity: true,
    manifestLoadingMaxRetry: 1000,
});
hls.loadSource('/watch/');
hls.attachMedia(video);
4. Deploying to Cloud Run
To deploy this to Cloud Run, I just need to package the encoding server code in a container that uses a base image with the ffmpeg binaries installed. Adding the following at the top of the Dockerfile would do:
FROM python:3.9.5-slim-buster
RUN apt-get update -qq && apt-get install -y ffmpeg
Build and upload the container to the registry:
gcloud builds submit server \
    --project $PROJECT \
    --tag gcr.io/$PROJECT/$IMAGE
Lastly, simply deploy to Cloud Run with the maximum request timeout of 60 minutes. Because the encoder writes to temporary shared memory and Cloud Run does not provide session affinity presently, we need to ensure a maximum of a single instance.
gcloud beta run deploy $SERVICE \
    --project $PROJECT \
    --region $REGION \
    --image=gcr.io/$PROJECT/$IMAGE \
    --max-instances=1 \
    --cpu=2 \
    --timeout=60m \
    --allow-unauthenticated
Caveats
This uses temporary in-memory file system storage via /dev/shm. The available space is close to the maximum amount of the memory available in the instance. But, there is no session affinity in Cloud Run.
Also, the maximum request duration is 1 hour. Eventually, the service will drop the connection. Furthermore, if the compute resource backing the instance is replaced under the hood or gone altogether, so is /dev/shm and any video content already encoded.
Conclusion
There’s so much more that can be done. This only scratched the surface. Next, I will find some time to add authentication, custom domains, and explore potential ways of scaling beyond a single instance.
I hope you find this useful. While this is far from a robust production-ready system, and you may want to take a different approach for a real application, it demonstrates the versatility and capabilities of the Raspberry Pi ecosystem and the beautiful simplicity and rich feature set of Google Cloud Run.
If you want try Google Cloud, you can sign up and get a $300 free credit to explore Cloud Run and many other products.
Disclaimer: I’m an Engineering Manager currently working in Google Cloud Run. But, this is my personal space. Content and opinions are my own. Please refer to the official Google Cloud Run documentation for the most accurate information about product specs, features, and capabilities.